
Constructing a Right Triangle: Step-by-Step Methods and Examples
Math Expert
Geometry
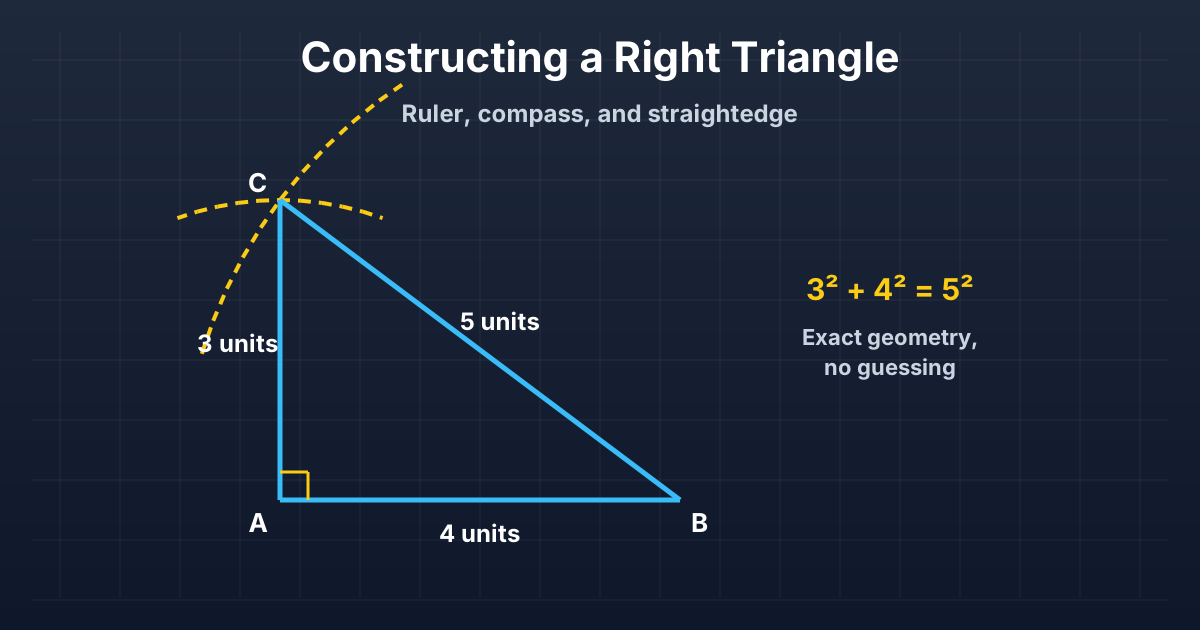
What if you had to draw a perfect 90-degree triangle without a protractor? It sounds hard, but with a ruler, a compass, and a few steps, you can build one that is exact. Constructing a right triangle is a skill geometry students need, and it is simpler than it looks once you know which method fits the measurements you have. A right triangle is a triangle with one 90-degree angle, and that square corner controls everything else: the two legs meet at a right angle, the hypotenuse sits opposite it, and the other two angles add to 90 degrees. In this guide you will learn to construct right triangles with a ruler and protractor, with a compass and straightedge, with a set square, from two legs, from a hypotenuse and a leg, from a hypotenuse and an angle, and with the 3-4-5 rule. By the end of this guide, you will be able to construct right triangles using several methods, check their accuracy, and understand the geometry behind each construction.
What Is a Right Triangle?
A right triangle is a triangle with exactly one angle of 90 degrees. The two sides that form the right angle are called legs, and they are perpendicular to each other. The side opposite the right angle is called the hypotenuse, and it is always the longest side. The other two angles are acute and add to 90 degrees.
A right triangle is special because its square corner gives you a fixed starting point. Once you know the right angle is in place, the rest of the triangle is controlled by the side lengths or angles you are given. That is why every construction in this guide starts the same way: fix the right angle first, then place the remaining measurements.
The two acute angles deserve a short explanation. The three angles in a right triangle add to 180 degrees. Since the right angle already takes 90 degrees, the other two must share the remaining 90 degrees. So if one acute angle is 35 degrees, the other is 55 degrees. If one is 40 degrees, the other is 50 degrees. This fact is used in several constructions below, especially when only one acute angle is given.
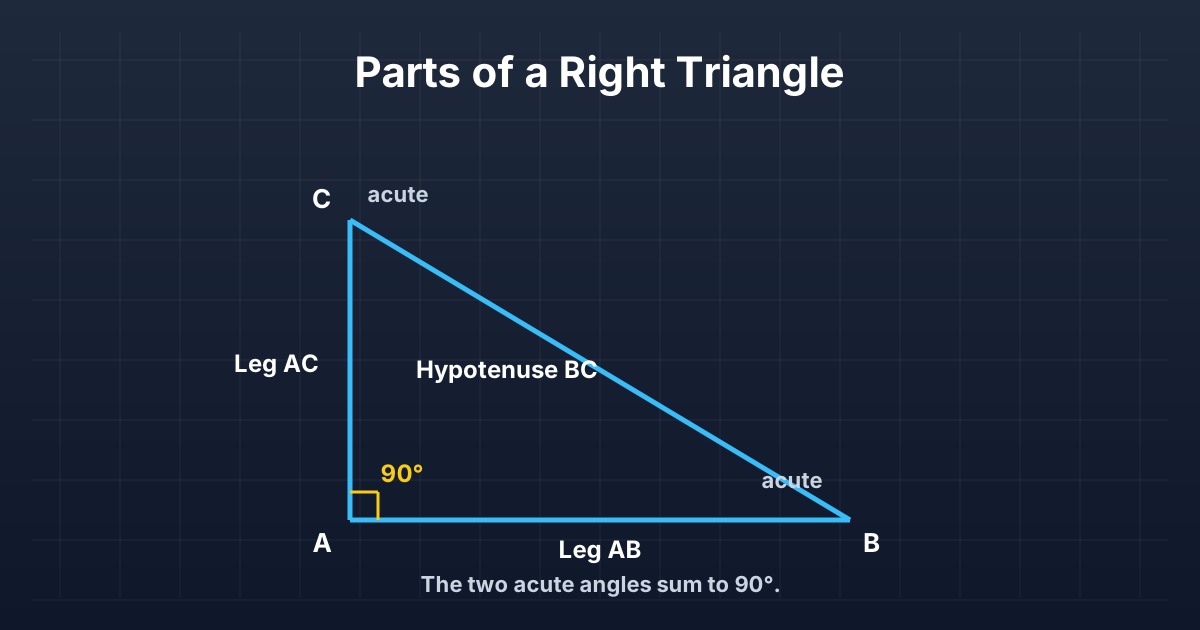
Caption: The parts of a right triangle. Legs AB and AC meet at the right angle at A, BC is the hypotenuse, and the two acute angles at B and C sum to 90 degrees.
Main Properties of a Right Triangle
| Property | What it means |
|---|---|
| One angle is 90 degrees | The triangle has exactly one right angle, never two. |
| The two legs are perpendicular | The legs meet at the right angle and form an L shape. |
| The hypotenuse is opposite the right angle | The hypotenuse never touches the right angle vertex. |
| The hypotenuse is the longest side | In any right triangle, the hypotenuse beats either leg. |
| The two acute angles are complementary | The two non-right angles add to 90 degrees. |
| The Pythagorean theorem relates the three sides | For legs a and b and hypotenuse c, a² + b² = c². |
The last property is the workhorse of this guide. It lets you compute a missing side before you draw, and it lets you check a finished construction after you draw. If the three sides do not satisfy a² + b² = c², with c as the longest side, the triangle is not right-angled, no matter how square it looks.
Tools Needed to Construct a Right Triangle
Good constructions start with the right tools. Each tool below does one job well, and knowing which tool does what is half the skill.
Ruler
A ruler measures lengths and draws straight segments. Use it to draw a base of an exact length, such as 6 cm, and to join two points with a straight line. Always measure from the zero mark, not from the end of the ruler, because the end is often worn or rounded. A small error at the zero mark becomes a wrong triangle.
Compass
A compass draws arcs and circles, transfers distances, and constructs perpendicular lines without measuring an angle. You set the compass to a length, such as the hypotenuse, and swing an arc that marks every point at that distance from the center. The compass is what makes exact geometric construction possible: it copies a length perfectly, while a ruler reading always has a little estimation in it.
Protractor
A protractor measures and draws angles. Use it to mark a 90-degree ray or a given acute angle such as 35 degrees. Place the center of the protractor exactly on the vertex and line up the base line with the segment you already drew. A protractor that is even slightly off center gives an angle that is slightly off, and the whole triangle follows that error.
Set Square
A set square is a triangular drawing tool with one built-in right angle. It draws perpendicular lines and right angles fast, without arcs or angle readings. Slide one edge along a ruler for a straight guide, then draw along the perpendicular edge. It is the quickest tool for the job, but it depends on the tool itself being truly square, so check it against a known right angle now and then.
Pencil and Paper
Use a sharp pencil for thin, exact lines. Thick lines hide errors: a line 1 mm wide can hide a 1 mm mistake, and that is enough to fail a check. Draw construction arcs lightly so the final triangle stands out, and do not erase the arcs. In school constructions, visible construction lines are part of the answer because they show how you got the result.
There is an important distinction between measured drawing and exact compass-and-straightedge construction. Measured drawing uses numbers from a ruler and protractor: you read 6 cm, you read 90 degrees, and small reading errors are unavoidable. Exact construction uses only a compass and an unmarked straightedge: you transfer lengths with the compass and build angles with arcs, so the result is exact in principle, even if your pencil is a little thick. Both approaches appear in this guide, and each method says which one it is.
A related point: a traditional unmarked straightedge is different from a graduated ruler. A straightedge only draws straight lines, it never measures. A ruler both draws and measures. When a method says “compass and straightedge,” it means no numbers are read off a scale. When a method says “ruler and protractor,” measurements are allowed and expected.
How to Construct a Right Triangle Using a Ruler and Protractor
This is the friendliest method for beginners, and it is the one to learn first. Work through it with real tools if you can, because the hand movements teach the geometry better than reading alone.
Construct triangle ABC with AB = 6 cm, AC = 4 cm, and angle BAC = 90 degrees. Here the right angle sits at A, between the two given sides.
Step 1: Draw the Base
Draw segment AB measuring 6 cm. Measure from the zero mark of the ruler and mark both endpoints clearly. Label the left endpoint A and the right endpoint B.
Step 2: Construct the Right Angle
Place the center of the protractor exactly on A, with the base line of the protractor lying along AB. Find the 90-degree mark and make a small dot there. Remove the protractor and draw a ray from A through that dot. This ray is perpendicular to AB.
Step 3: Mark the Second Side
Measure 4 cm along the perpendicular ray, starting at A. Mark the endpoint and label it C. Now AC = 4 cm, and angle BAC is 90 degrees by construction.
Step 4: Join the Remaining Vertices
Use the ruler to connect B to C. This segment is the hypotenuse, and the triangle is complete.
Step 5: Verify the Triangle
Check angle BAC with the protractor: it should read 90 degrees. Then check the hypotenuse with the Pythagorean theorem. BC² = 6² + 4² = 36 + 16 = 52, so BC = √52 = 2√13 cm, about 7.21 cm. Measure BC with the ruler. If it reads about 7.2 cm, the construction is good. If it reads something clearly different, the right angle or one of the side lengths went wrong, and the triangle should be redrawn.
The triangle is right-angled because angle BAC was built as 90 degrees, not because the finished shape looks square. That distinction matters: a construction is correct because of its steps, and the measurement check only confirms that the steps were followed well.
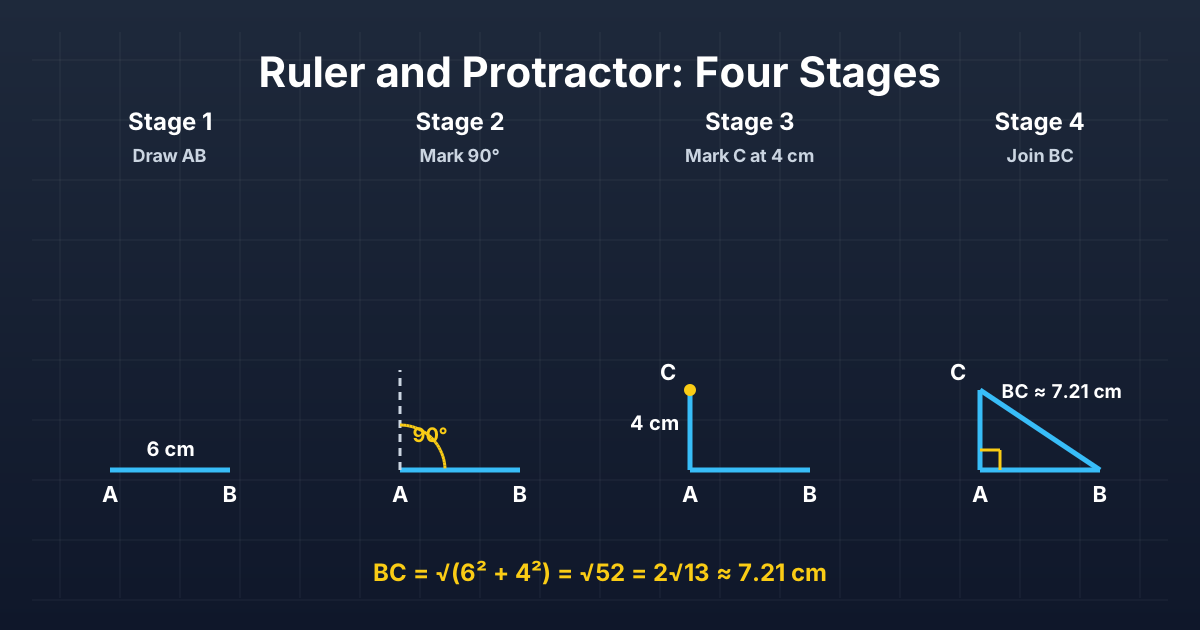
Caption: The ruler and protractor construction in four stages. AB = 6 cm, AC = 4 cm, angle BAC = 90 degrees, and the hypotenuse BC measures about 7.21 cm.
Construction checklist for this method: base measured from zero, protractor centered exactly on A, ray drawn through the 90-degree mark, second side measured from A, hypotenuse joined last, and the final check done with both the protractor and the Pythagorean theorem.
Constructing a Right Triangle With a Compass and Straightedge
This is the exact method: no protractor, no angle reading, only a compass and an unmarked straightedge. The key step is constructing a perpendicular at a point on a line, which is worth learning on its own because it appears in almost every compass construction.
Step 1
Draw a line and mark a point A on it. This line will carry one leg of the triangle, and A will be the right-angle vertex.
Step 2
Mark two points D and E on the line, equally distant from A and on opposite sides. Set the compass to any convenient width, place the point at A, and swing an arc that cuts the line on both sides. Label the left cut D and the right cut E. Now AD = AE by construction.
Step 3
With equal compass radius greater than AD, draw arcs centered at D and E that intersect at point P on one side of the line. Keep the compass width fixed between the two arcs: that equality is what makes the construction work. If the radius is not greater than AD, the arcs may not meet at all.
Step 4
Draw line AP with the straightedge. This line is perpendicular to the original line, so the angle at A is exactly 90 degrees. Extend the line as far as you need for the second leg.
Why does this work? Points D and E are symmetric about A, and P is equally distant from D and E because both arcs used the same radius. Any point equally distant from D and E lies on the perpendicular bisector of segment DE, and that bisector passes through the midpoint of DE, which is A. So line AP is the perpendicular bisector of DE, and it meets the original line at a right angle at A. No angle was measured, yet the angle is exact.
Step 5
Choose point B on the original line and point C on the perpendicular ray. Measure or transfer the lengths you want with the compass: for example, set AB to one leg length and AC to the other. Mark B on the line through A, and mark C on the ray through A.
Step 6
Connect B and C with the straightedge. Triangle ABC has its right angle at A, because AB lies on the original line and AC lies on the perpendicular ray.
Keep the construction arcs visible and distinct from the final triangle. Draw arcs lightly and dashed if your tools allow it, and draw the triangle sides bold. In the diagram below, the arcs are dashed gold and the triangle is solid blue, so the reader can tell at a glance which lines are construction and which lines are the answer. Erasing the arcs would hide the reasoning, and in school work it would lose marks.
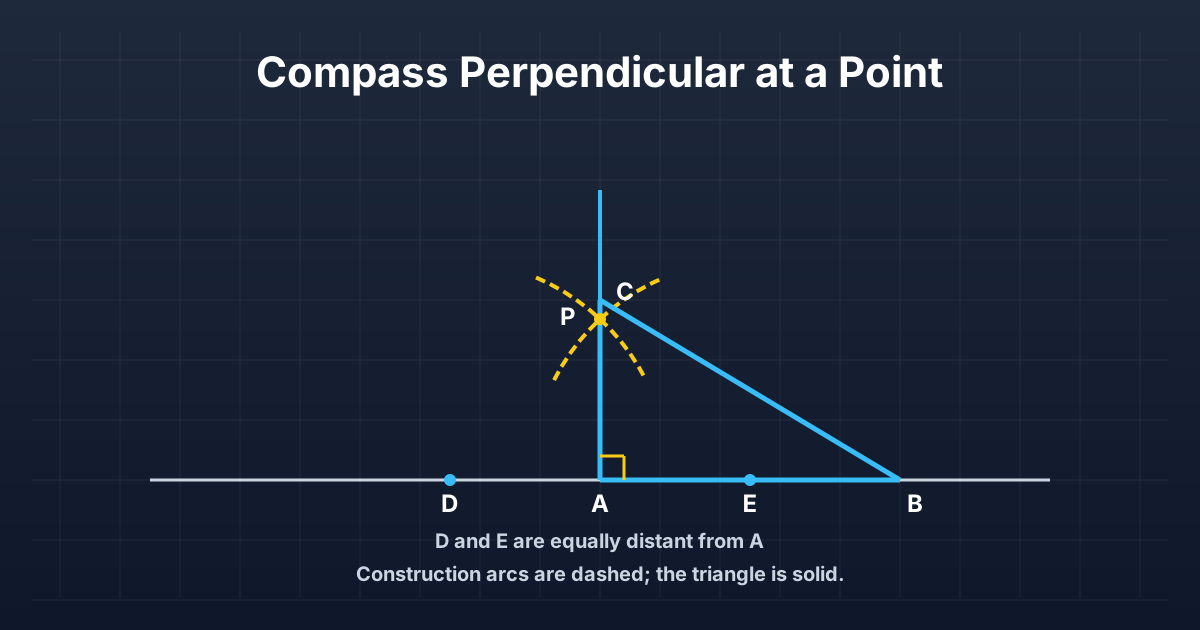
Caption: The perpendicular construction. D and E sit equally distant from A, the two equal arcs meet at P, and line AP is perpendicular to the original line. Triangle ABC is then built on that right angle.
Constructing a Right Triangle Using a Set Square
The set square method is the fast measured method. It suits classroom work and quick sketches where a protractor feels slow.
- Draw a base segment of the length you need, and label its endpoints.
- Place the set square so that one edge of its right angle lies along the base, with the corner of the set square exactly on the endpoint where the right angle belongs.
- Hold the set square firmly and draw along the other edge of its right angle. This gives a perpendicular ray.
- Measure the second leg along that ray from the corner and mark the endpoint.
- Join the remaining two vertices with a ruler to complete the triangle.
- Check the 90-degree angle by placing the set square back on the corner: both edges should lie exactly along the two legs.
The advantage of this method is speed. One tool placement gives the whole right angle, with no arc drawing and no protractor reading. The limitation is accuracy: the result is only as square as the set square itself, and a cheap or warped set square gives a slightly wrong angle on every triangle. Another limitation is that it is a measured method, not an exact construction, so it does not prove anything about the geometry. It draws a right triangle, but it does not show why the angle is right. For homework checks and quick sketches that is fine. For construction exercises that ask for proof, use the compass method instead.
Constructing a Right Triangle Given Two Legs
Two perpendicular side lengths determine a right triangle completely, up to congruence. That means any two people who follow the same two leg lengths will produce triangles that match exactly when laid on top of each other, even if one triangle is flipped over. The reason is simple: the right angle fixes the shape of the corner, and the two lengths fix where the other two vertices sit. Nothing is left free.
Use the example: one leg = 5 cm, other leg = 12 cm.
- Draw a base segment of 12 cm and label its endpoints A and B.
- Construct a perpendicular ray at A, using a protractor, a set square, or the compass method from the previous section.
- Measure 5 cm along the perpendicular ray from A and mark point C.
- Join B to C.
- Calculate the hypotenuse before measuring it: BC² = 5² + 12² = 25 + 144 = 169, so BC = 13 cm. Measure BC to confirm it reads 13 cm.
The result is the famous 5-12-13 triangle, and the check is satisfying because it comes out exact: 13 cm, not about 13 cm. That exactness is a sign that the construction is right. If BC measured 12.6 cm or 13.4 cm, the right angle would be the first suspect.
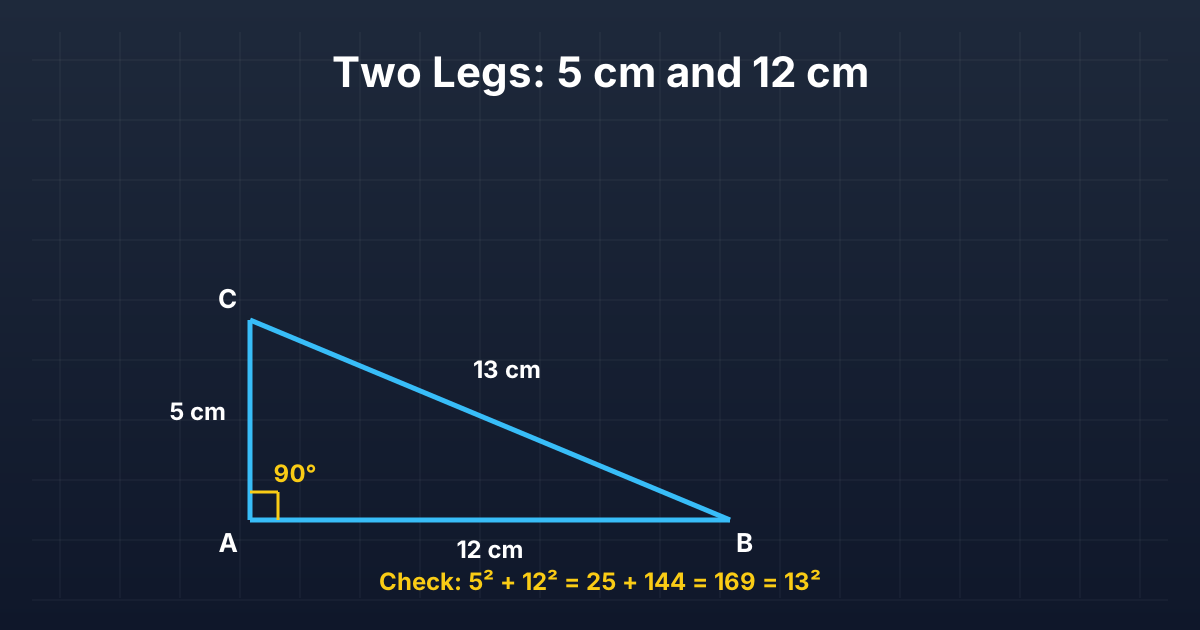
Caption: The 5-12-13 triangle. Legs of 5 cm and 12 cm at a right angle always give a hypotenuse of exactly 13 cm, since 5² + 12² = 13².
The uniqueness point is worth stating plainly. Given two legs and the right angle between them, there is no freedom left: the hypotenuse is forced by the Pythagorean theorem, and the acute angles are forced by the side lengths. Changing the order of the legs, putting 5 cm on the base and 12 cm on the ray, gives the mirror image of the same triangle, not a different one.
Constructing a Right Triangle Given the Hypotenuse and One Leg
This case is trickier, because the given leg and the hypotenuse share a vertex, and the third vertex must be found by intersection, not by direct measurement. There are two good methods. The first uses a perpendicular and a circle. The second uses Thales’ Theorem.
Use the example: hypotenuse = 10 cm, one leg = 6 cm.
Method A: Perpendicular and Circle Intersection
- Draw a segment AB of length 6 cm. This is the given leg.
- Construct a perpendicular ray at A, using a protractor, a set square, or the compass method.
- Draw a circle centered at B with radius 10 cm. In practice, set the compass to 10 cm, place the point at B, and swing an arc that crosses the perpendicular ray. The full circle is not needed, only the arc near the ray.
- Mark the intersection of the arc with the perpendicular ray as C.
- Join B to C.
- Verify that BC = 10 cm and angle BAC = 90 degrees.
Calculate the missing leg before measuring it: AC² = 10² - 6² = 100 - 36 = 64, so AC = 8 cm. Measure AC to confirm it reads 8 cm. The triangle is 6-8-10, which is just the 3-4-5 triangle scaled by 2.
Why must the hypotenuse be longer than the given leg? Because the hypotenuse is the longest side of any right triangle. If someone gives you a “hypotenuse” of 6 cm and a “leg” of 10 cm, the construction is impossible: the circle of radius 6 cm centered at B can never reach the perpendicular ray at a point 10 cm from A in the right way, and the numbers themselves refuse, since 6² - 10² is negative and has no real square root. Always check this first. If the hypotenuse is not the longest length, stop and re-read the problem.
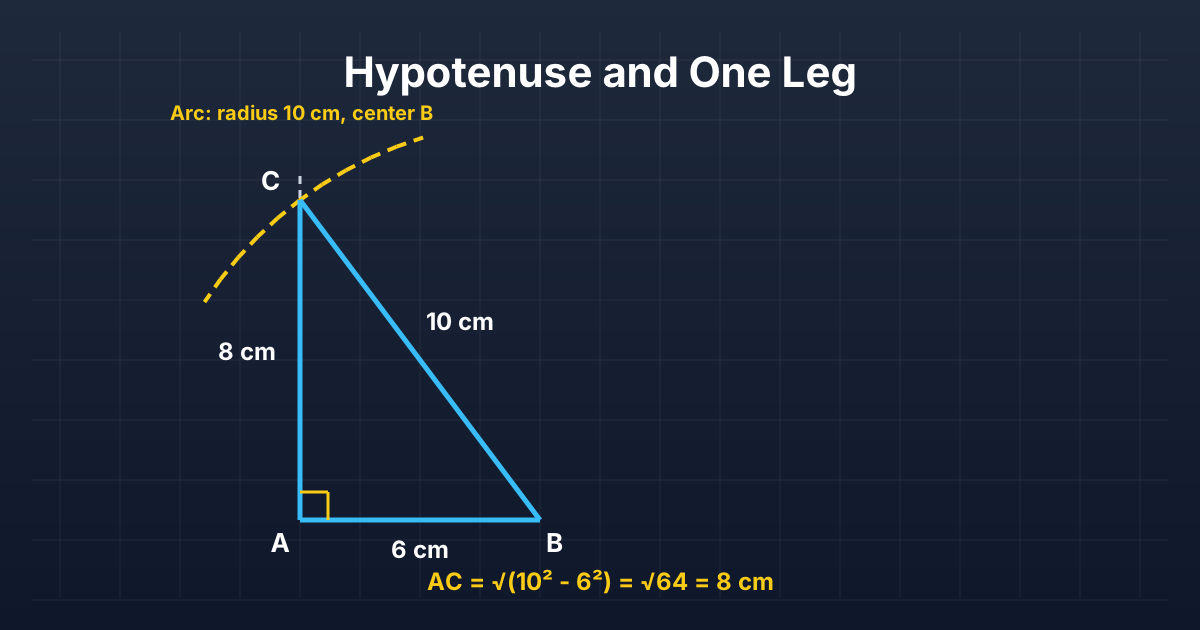
Caption: Method A. AB = 6 cm is the given leg, the dashed arc has radius 10 cm centered at B, and it meets the perpendicular ray at C. Then AC = 8 cm and BC = 10 cm.
Method B: Thales’ Theorem
Draw the hypotenuse as the diameter of a circle, then pick the third vertex on the circle. The construction runs like this: draw a segment of 10 cm, find its midpoint, draw the circle with that segment as diameter, set the compass to 6 cm from one endpoint, and mark where that arc meets the circle. That meeting point is the third vertex, and the angle there is 90 degrees by Thales’ Theorem. The full Thales construction gets its own section below, because it is useful far beyond this one problem.
Method A is usually easier when a leg length is given, because the perpendicular ray is already part of the plan. Method B is easier when an angle is given instead of a leg, as the next section shows. Knowing both means you can pick the method that matches the information you actually have.
Constructing a Right Triangle Given a Hypotenuse and an Acute Angle
Use: hypotenuse AB = 8 cm, angle A = 35 degrees. This construction leans on Thales’ Theorem, and it is a good example of a theorem doing real work.
- Draw AB = 8 cm. This segment will be both the hypotenuse and the diameter of the construction circle.
- Construct the circle with diameter AB: find the midpoint of AB with a perpendicular bisector or by measuring 4 cm from either end, then draw the circle with that midpoint as center and radius 4 cm.
- Draw a ray from A forming a 35-degree angle with AB, using a protractor. The ray must go toward the circle, not away from it.
- Mark the second intersection of the ray with the circle as C. The ray starts at A, which is itself on the circle, so it meets the circle twice: once at A and once at the new point C. That distinct second point is what you want. If the ray only touches the circle at A, the angle was drawn on the wrong side, so redraw it toward the circle.
- Join BC.
- Explain why angle ACB = 90 degrees: AB is a diameter and C lies on the circle, so Thales’ Theorem guarantees the angle at C is a right angle. The triangle is complete, with hypotenuse AB = 8 cm and angle A = 35 degrees.
The remaining angle follows at once: angle B = 90 - 35 = 55 degrees, since the acute angles sum to 90 degrees. The side lengths follow from the angle and the hypotenuse through sine and cosine: AC = 8 × cos 35° ≈ 6.55 cm, and BC = 8 × sin 35° ≈ 4.59 cm. Measure both to check the construction. If AC reads about 6.6 cm and BC reads about 4.6 cm, the construction is good.
The same diagram used in the Thales section below shows this exact triangle, with the 35-degree ray, the 55-degree angle at B, and the right angle at C all labeled.
Constructing a Right Triangle Using Thales’ Theorem
Thales’ Theorem says: if AB is the diameter of a circle and C is another point on the circumference, then angle ACB = 90 degrees. The triangle is inscribed in a semicircle, and its angle on the circle is always square. This is one of the most useful construction tools in geometry, because it turns a circle into a right-angle machine: pick any point on the circle and the right angle comes free.
The dedicated construction runs as follows. Draw a segment AB of whatever length you want the hypotenuse to be. Find its midpoint O, either by constructing the perpendicular bisector or by measuring half the length. Draw the circle with center O and radius OA, so AB is a diameter. Pick any point C on the circle that is not A or B, and join AC and BC. Triangle ABC is right-angled at C. That is the whole method, and it works for every choice of C, which is why it is so powerful: the circle gives you infinitely many right triangles with the same hypotenuse.
The parts of the construction each have a name worth learning. The diameter is the segment through the center joining two opposite points of the circle. The center is the point equally distant from every point on the circle. The semicircle is half the circle, cut by the diameter. The inscribed triangle is the triangle whose vertices all lie on the circle. The right angle is the angle at C, subtended by the diameter.
Why does it work? The short proof sketch uses the inscribed angle theorem: an angle inscribed in a circle measures half the arc it intercepts. Angle ACB intercepts the semicircular arc from A to B, which measures 180 degrees, so angle ACB measures half of that, which is 90 degrees. A fuller proof joins C to the center O and uses the fact that OA, OB, and OC are all radii, making two isosceles triangles whose base angles add to 90 degrees. Either route gives the same result, and the companion article on Thales’ Theorem works through both proofs in full.
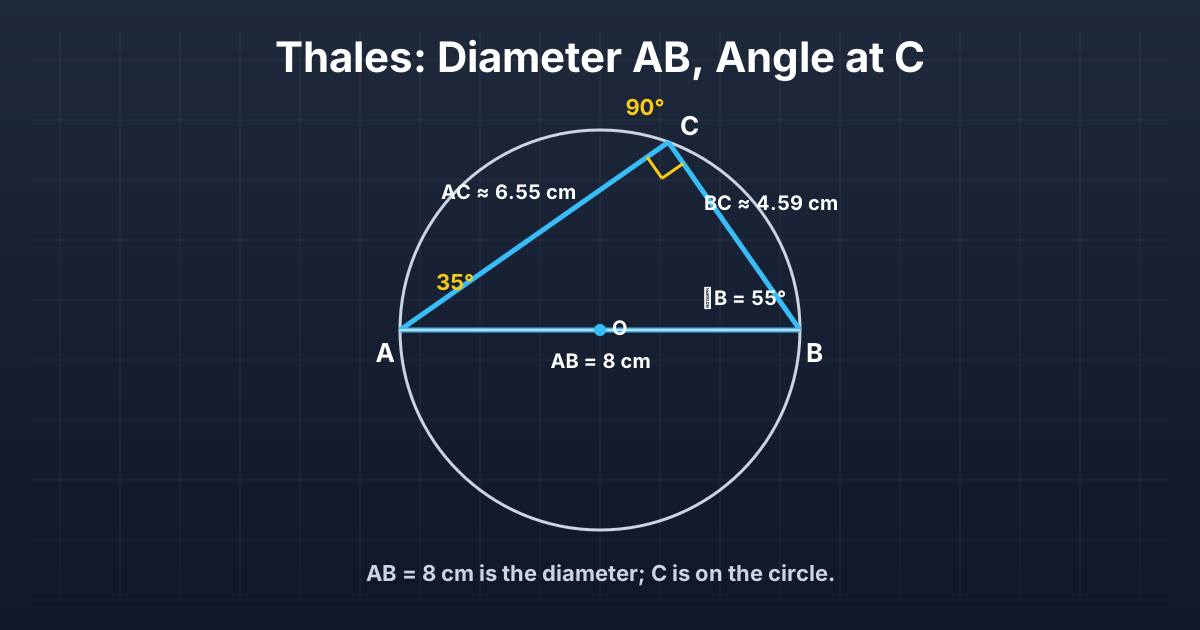
Caption: The Thales construction for a hypotenuse of 8 cm and an angle of 35 degrees at A. C lies on the circle, so angle ACB is 90 degrees, angle B is 55 degrees, AC is about 6.55 cm, and BC is about 4.59 cm.
One warning: C must be a genuinely different point from A and B. If C slides onto A or B, the triangle collapses into a segment and there is no angle at all. In practice this is never a problem, because you pick C visibly away from both endpoints.
Constructing a Right Triangle Using the 3-4-5 Rule
The 3-4-5 rule is the Pythagorean theorem in its simplest whole-number form: 3² + 4² = 9 + 16 = 25 = 5². Any triangle with sides in the ratio 3:4:5 is right-angled, and the right angle sits between the sides of length 3 and 4. That gives a construction that needs no protractor and no perpendicular step: the side lengths themselves force the right angle.
The ruler-and-compass construction runs like this:
- Draw AB = 4 cm.
- Draw an arc centered at A with radius 3 cm.
- Draw an arc centered at B with radius 5 cm.
- Mark an intersection C of the arcs. Two arcs meet at two points, one on each side of AB, and either one works. Pick the one on the side where you want the triangle.
- Join AC and BC.
- Verify that angle BAC = 90 degrees. The check is the Pythagorean relation: 3² + 4² = 5², so by the converse of the Pythagorean theorem the angle opposite the side of length 5, which is the angle at A, must be a right angle.
Why is the right angle at A? Because the side opposite the right angle is always the hypotenuse, the longest side. Here the longest side is BC = 5 cm, opposite vertex A, so the right angle is at A. Students often guess the right angle is at C because C is the “new” point, but the side lengths decide, not the order of construction.
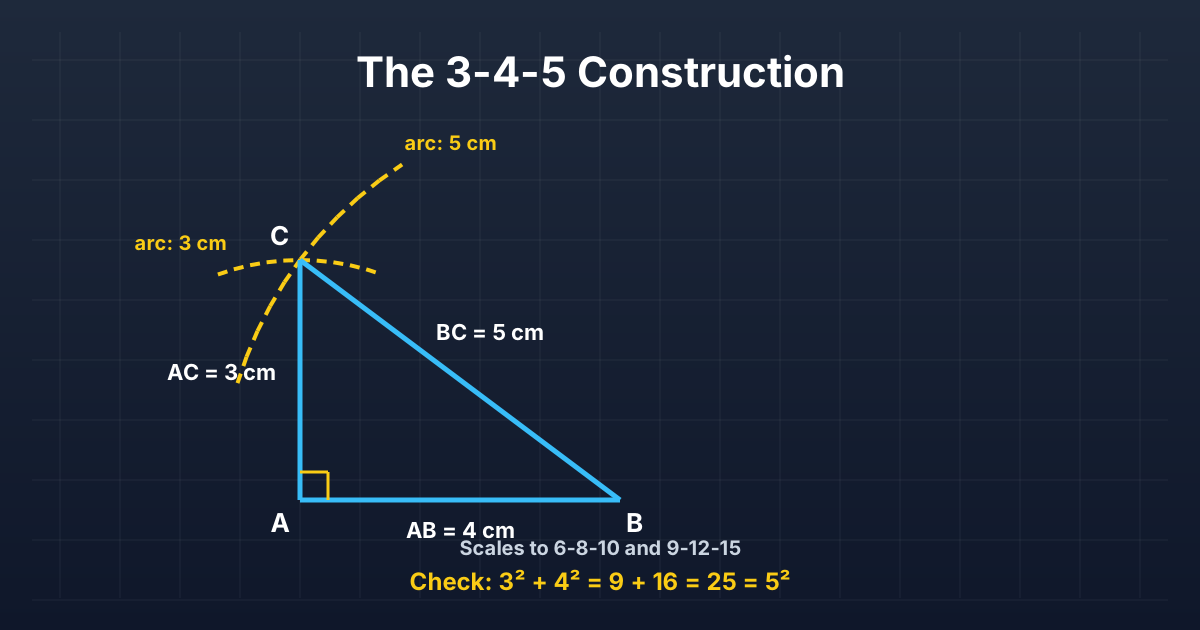
Caption: The 3-4-5 construction. AB = 4 cm, the dashed arc from A has radius 3 cm, the dashed arc from B has radius 5 cm, and they meet at C. Then AC = 3 cm, BC = 5 cm, and angle BAC is 90 degrees.
Scaling is where the rule earns its keep. Multiply all three numbers by the same factor and the triangle stays right-angled: 6-8-10 (times 2), 9-12-15 (times 3), 12-16-20 (times 4), and so on. On a building site, nobody uses centimeters: a 3-4-5 check with 3 feet, 4 feet, and 5 feet squares a small corner, while 9-12-15 feet squares a large one more accurately, because a fixed tape error matters less over longer legs.
There is one distinction to keep clear: exact geometric construction versus approximate physical measurement. On paper, the arcs meet at exactly one point and the angle is exactly 90 degrees. On a building site, a tape measure stretches, a stake moves, and the diagonal reads 5 feet plus a little. The method is the same, but the paper version is exact and the field version is approximate. Treat a field check as passed when the diagonal matches within the tolerance of your measuring tools, and remeasure when it is clearly off.
Constructing a Right Triangle With One Leg and One Acute Angle
Use: AB = 7 cm, angle A = 90 degrees, angle B = 40 degrees. Here the right angle and one acute angle are both given, so the third angle is already known before drawing starts.
- Draw AB = 7 cm.
- Construct a perpendicular ray at A, using a protractor, a set square, or the compass method.
- Construct a 40-degree ray at B toward the perpendicular ray, using a protractor centered at B with its base line along BA. The ray must lean toward the perpendicular, not away from it, or the two rays will never meet.
- Mark the intersection of the two rays as C.
- Connect the vertices: AC is already drawn as part of the perpendicular ray, and BC is the new segment. The triangle is complete.
- Verify that the third angle is 50 degrees: the angles sum to 180 degrees, so angle C = 180 - 90 - 40 = 50 degrees. Check it with a protractor.
The side lengths can be predicted too: AC = 7 × tan 40° ≈ 5.87 cm, and BC = 7 / cos 40° ≈ 9.14 cm. Check: 7² + 5.87² = 49 + 34.46 = 83.46, and 9.14² = 83.54, which agree to rounding. Measuring AC at about 5.9 cm and BC at about 9.1 cm confirms a good construction.
These measurements determine the triangle up to congruence, for the same reason as the two-legs case: the right angle fixes the corner, the leg fixes one side, and the acute angle fixes the direction of the hypotenuse, so the third vertex has nowhere else to go. Any two people following these measurements will produce identical triangles.
Can You Construct a Right Triangle With Only One Side?
No, not a unique one. A single side length does not determine a unique right triangle, and this is a common exam trap. You can always construct some right triangle with a given side, but you cannot pin down which one without more information.
Take a leg of 6 cm. It could belong to a 6-8-10 triangle, where the other leg is 8 cm and the hypotenuse is 10 cm. A leg of 6 cm could pair with another leg of 5 cm, giving a hypotenuse of √61 ≈ 7.81 cm. It could pair with a leg of 12 cm, giving a hypotenuse of √180 ≈ 13.42 cm. Same leg, three different triangles, all perfectly valid.
The same holds for a hypotenuse. A hypotenuse of 10 cm could belong to a 6-8-10 triangle, or to a triangle with legs 5 cm and about 8.66 cm (since 5² + 8.66² ≈ 25 + 75 = 100), or to an isosceles right triangle with legs of about 7.07 cm each (since 2 × 7.07² ≈ 100). One hypotenuse, many triangles.
The additional information that fixes a unique triangle is one of these: two legs; a hypotenuse and one leg; one leg and one acute angle; or a hypotenuse and one acute angle. Each of those pairs appears as a method in this guide, and each one leaves no freedom once the right angle is fixed.
The distinction to remember is between constructing any right triangle and constructing a uniquely determined triangle. “Draw a right triangle with a leg of 6 cm” is an easy task with many answers. “Draw the right triangle with legs 6 cm and 8 cm” has exactly one answer up to congruence. Exam questions almost always mean the second kind, so read the given information carefully and check that it matches one of the four pairs above.
How to Check Whether a Constructed Triangle Is Right-Angled
A construction is not finished until it is checked. Use at least one of these three methods, and two if the result matters.
Method 1: Check the Angle
Use a protractor or a set square to check for 90 degrees. Place the protractor center exactly on the vertex and read the angle. Place the set square corner on the vertex and see whether both edges lie along the legs. This method is direct and fast, but it is only as accurate as your reading: a protractor reading of 89 or 91 degrees usually means a reading error or a drawing error, and either way the construction needs attention.
Method 2: Use the Pythagorean Theorem
Verify that a² + b² = c², where c is the longest side. Measure all three sides, square the two shorter ones, add them, and compare with the square of the longest. For example, sides of 6 cm, 8 cm, and 10 cm give 36 + 64 = 100 = 10², so the triangle is right-angled. This method rests on the converse of the Pythagorean theorem: if the sides satisfy the relation, the angle opposite the longest side must be a right angle. It is the most reliable check because it uses three measurements that can catch each other’s errors.
Method 3: Check Perpendicularity
Confirm that the two legs meet at a right angle by testing the corner itself. A set square laid on the corner should fit exactly, with no gap on either side. A carpenter’s version of the same test is the 3-4-5 check: mark 3 units along one leg and 4 units along the other, and measure the distance between the marks. If it reads exactly 5 units, the corner is square.
A final caution about measurement errors. Approximate numerical agreement is not the same as an exact geometric proof. Sides of 6.0 cm, 8.1 cm, and 10.0 cm give 36 + 65.61 = 101.61 against 100, which is close but not equal: the triangle is slightly off, and the gap tells you the construction drifted. On paper, aim for agreement within your ruler’s reading tolerance, roughly half a millimeter, and redraw when the gap is clearly larger. In a proof, the steps guarantee the result and the measurements only confirm it. In a drawing, the measurements are the result, so they deserve care. If you need to find missing sides or angles after constructing, the guide to solving a right triangle covers the calculations, and the right triangle formulas page collects the relations used above.
Right Triangle Construction Examples With Solutions
The six examples below cover the methods from the guide. Each one states the given measurements, the tools, the numbered steps, a description of the diagram, the mathematical verification, and the final result. Work through them in order: the first three are direct, the last three combine methods.
Example 1: Constructing a 3-4-5 Triangle
Given: three side lengths, 3 cm, 4 cm, and 5 cm. Required: a right triangle with those sides. Tools: ruler, compass, straightedge.
- Draw AB = 4 cm.
- Set the compass to 3 cm, place the point at A, and draw an arc.
- Set the compass to 5 cm, place the point at B, and draw an arc that crosses the first arc.
- Mark the intersection as C.
- Join AC and BC.
Diagram: a horizontal base AB of 4 cm, a dashed arc of radius 3 cm sweeping from A, a dashed arc of radius 5 cm sweeping from B, and the completed triangle with C at the top of the arcs. The diagram in the 3-4-5 section shows exactly this construction.
Verification: 3² + 4² = 9 + 16 = 25 = 5², so by the converse of the Pythagorean theorem the triangle is right-angled. The right angle is at A, opposite the longest side BC = 5 cm.
Final result: triangle ABC with AB = 4 cm, AC = 3 cm, BC = 5 cm, right-angled at A.
Example 2: Constructing a Triangle With Legs 6 cm and 8 cm
Given: two legs, 6 cm and 8 cm. Required: the right triangle with those legs. Tools: ruler, protractor, straightedge.
- Draw AB = 8 cm.
- Place the protractor at A and mark a 90-degree ray.
- Measure 6 cm along the ray from A and mark C.
- Join BC.
- Measure BC and compare with the calculated value.
Diagram: a horizontal base of 8 cm, a vertical ray at A rising 6 cm to C, and the hypotenuse sloping down from C to B. The right-angle square sits at A.
Verification: BC² = 6² + 8² = 36 + 64 = 100, so BC = 10 cm. The triangle is 6-8-10, the 3-4-5 triangle scaled by 2. Measuring BC at 10 cm confirms the construction.
Final result: triangle ABC with AB = 8 cm, AC = 6 cm, BC = 10 cm, right-angled at A.
Example 3: Constructing a Triangle With Hypotenuse 13 cm and Leg 5 cm
Given: hypotenuse 13 cm, one leg 5 cm. Required: the right triangle. Tools: ruler, compass, protractor or set square.
- Draw AB = 5 cm, the given leg.
- Construct a perpendicular ray at A.
- Set the compass to 13 cm, place the point at B, and swing an arc across the perpendicular ray.
- Mark the intersection as C.
- Join BC.
Diagram: a short horizontal leg AB of 5 cm, a vertical ray at A, and a long dashed arc of radius 13 cm centered at B cutting the ray high above A. The completed triangle is tall and narrow.
Verification: the missing leg is AC = √(13² - 5²) = √(169 - 25) = √144 = 12 cm. The triangle is 5-12-13. Measuring AC at 12 cm and BC at 13 cm confirms the construction, and the hypotenuse is longer than either leg, as it must be.
Final result: triangle ABC with AB = 5 cm, AC = 12 cm, BC = 13 cm, right-angled at A.
Example 4: Constructing a Triangle With a 30-Degree Acute Angle
Given: hypotenuse 10 cm and acute angle 30 degrees. Required: the right triangle. Tools: ruler, compass, protractor.
- Draw AB = 10 cm, which will be the hypotenuse and the diameter of the construction circle.
- Find the midpoint of AB and draw the circle with diameter AB.
- Draw a ray from A at 30 degrees to AB, toward the circle, using the protractor.
- Mark the second intersection of the ray with the circle as C.
- Join BC.
Diagram: a horizontal diameter AB of 10 cm, a circle around it, a shallow 30-degree ray from A rising to meet the circle at C, and the triangle ABC inside the semicircle with its right angle at C.
Verification: angle ACB = 90 degrees by Thales’ Theorem. The sides are AC = 10 × cos 30° = 10 × (√3/2) ≈ 8.66 cm and BC = 10 × sin 30° = 10 × 0.5 = 5 cm. The Pythagorean check: 5² + 8.66² = 25 + 75 = 100 = 10², which agrees to rounding. The third angle is 60 degrees, since 90 - 30 = 60, making this a 30-60-90 triangle.
Final result: triangle ABC with AB = 10 cm, AC ≈ 8.66 cm, BC = 5 cm, angles 30 degrees at A, 60 degrees at B, and 90 degrees at C.
Example 5: Constructing a Right Triangle Using a Compass Only for Length Transfers and a Straightedge for Lines
Given: two leg lengths supplied as line segments, 9 cm and 12 cm, with no protractor allowed. Required: the right triangle, built by exact construction. Tools: compass, unmarked straightedge.
- Draw a line and mark point A on it.
- Construct a perpendicular at A with the compass method: mark D and E equally distant from A, swing equal arcs from D and E, and draw the perpendicular through their intersection P.
- Set the compass to the 9 cm segment, place the point at A, and mark C on the perpendicular ray.
- Set the compass to the 12 cm segment, place the point at A, and mark B on the original line.
- Join BC with the straightedge.
Diagram: a horizontal line with the perpendicular construction arcs visible around A, the point C on the vertical ray, the point B on the horizontal line, and the bold triangle ABC over light dashed arcs.
Verification: no angle was measured at any step, yet the angle at A is exactly 90 degrees by the perpendicular construction. The hypotenuse is BC = √(9² + 12²) = √(81 + 144) = √225 = 15 cm. The triangle is 9-12-15, the 3-4-5 triangle scaled by 3. Measuring BC at 15 cm confirms the transfer lengths were correct.
Final result: triangle ABC with AC = 9 cm, AB = 12 cm, BC = 15 cm, right-angled at A, built without a protractor.
Example 6: Constructing a Right Triangle Using Thales’ Theorem
Given: a circle with diameter 12 cm and a point C on the circle with AC = 6 cm. Required: the right triangle ABC. Tools: ruler, compass, straightedge.
- Draw AB = 12 cm.
- Find the midpoint O of AB and draw the circle with center O and radius 6 cm.
- Set the compass to 6 cm, place the point at A, and mark the intersection of that arc with the circle as C.
- Join AC and BC.
Diagram: a circle with horizontal diameter AB, center O marked, and point C on the upper circle joined to both endpoints, forming a triangle inside the semicircle with its right angle at C.
Verification: angle ACB = 90 degrees by Thales’ Theorem, since AB is a diameter and C lies on the circle. The remaining side is BC = √(12² - 6²) = √(144 - 36) = √108 = 6√3 ≈ 10.39 cm. The angles follow from the sides: sin of angle B = 6/12 = 0.5, so angle B = 30 degrees, and angle A = 60 degrees. The check 6² + 10.39² = 36 + 108 = 144 = 12² confirms the numbers.
Final result: triangle ABC with AB = 12 cm, AC = 6 cm, BC ≈ 10.39 cm, angles 60 degrees at A, 30 degrees at B, and 90 degrees at C.
Common Mistakes When Constructing a Right Triangle
Most construction errors are small and preventable. Each mistake below states the cause, the consequence, and the correction, so you can spot your own errors before they cost marks.
-
Drawing an angle slightly different from 90 degrees. Cause: the protractor center sits off the vertex, or the set square slips. Consequence: every side length that depends on the angle comes out wrong, and the Pythagorean check fails. Correction: center the protractor exactly, hold the set square firmly, and verify the angle after drawing.
-
Confusing the hypotenuse with a leg. Cause: the longest side is not identified before construction starts. Consequence: the “hypotenuse” arc cannot reach the ray, or the triangle comes out with the right angle at the wrong vertex. Correction: label the hypotenuse first, check that it is the longest length, and put the right angle opposite it.
-
Measuring from the wrong ruler mark. Cause: measuring from the end of the ruler instead of the zero mark. Consequence: every length is off by the same small amount, and the triangle is the wrong size. Correction: always start at zero, and check the zero mark itself, since worn rulers lose their first millimeter.
-
Changing compass width unintentionally. Cause: the compass hinge slips or a finger presses the legs together mid-arc. Consequence: arcs that should meet do not meet, or meet at the wrong point. Correction: tighten the hinge, hold the compass by its top handle only, and recheck the width against the given segment before each arc.
-
Using the wrong compass radius. Cause: the radius is set to the wrong given length, such as the hypotenuse when the leg was meant. Consequence: the intersection point lands in the wrong place and the triangle has wrong sides. Correction: say the radius out loud before drawing each arc, and label each arc with its radius in your notes.
-
Placing construction arcs incorrectly. Cause: arcs are drawn on the wrong side of the base, or centered at the wrong point. Consequence: the arcs miss each other or produce a triangle on the wrong side. Correction: mark the center point clearly before swinging each arc, and draw arcs long enough to cross.
-
Joining the wrong points. Cause: two arc intersections look similar, or labels are missing. Consequence: a triangle is drawn that uses the wrong intersection and has wrong angles. Correction: label every point as soon as it is created, and join only labeled points.
-
Ignoring impossible side-length constraints. Cause: the numbers are not checked before drawing starts. Consequence: time is wasted on a construction that cannot exist, such as a hypotenuse shorter than a leg. Correction: check that the hypotenuse is the longest length and that the three lengths satisfy the triangle inequality before picking up the compass.
-
Mislabeling vertices and angles. Cause: labels are added at the end from memory instead of during construction. Consequence: the right angle ends up attributed to the wrong vertex, and the written solution contradicts the drawing. Correction: label each vertex the moment it is created, and write the angle at the vertex it belongs to.
-
Failing to verify the completed triangle. Cause: the construction looks right, so the check feels unnecessary. Consequence: a small error survives into the final answer and costs marks. Correction: always run at least one check, the Pythagorean relation if side lengths are known, or the protractor if they are not.
Real-Life Applications of Right Triangle Construction
Right triangles are not just school exercises. They appear wherever a square corner or a straight measurement matters, and the construction methods from this guide map directly onto real jobs.
In architecture, floor plans are built from right angles: rooms, walls, and doorways all depend on square corners, and a plan that is not square gives a building that is not square. In construction layout, workers mark right angles on the ground before digging foundations, because a foundation that starts out of square stays out of square all the way up. In carpentry, shelf brackets, roof gussets, and stair stringers are cut as right triangles, and a wrong angle means a joint that does not close. In engineering drawings, right triangles define slopes, ramps, and supports, and the dimensions on the drawing must match the parts in the shop. In surveying, right triangles turn one measured distance and one angle into positions on a map, and the whole traverse depends on each corner being exact. In computer-aided design, right triangles are the simplest polygons the software can draw exactly, and complex shapes are built from them. In mathematics education, constructions teach the link between a theorem and a drawing: Thales’ Theorem stops being a sentence and becomes a tool.
The practical example that ties all of this together is the 3-4-5 check on a rectangular layout. Suppose you are marking a rectangular patio. Drive a stake at the corner, run a string along one planned edge, and measure 3 feet along it. Run a second string roughly at a right angle and measure 4 feet along it. Now measure the diagonal between the two marks: if it reads exactly 5 feet, the corner is square. If it reads 5 feet 2 inches, the angle is too wide, so pull the second string in. If it reads 4 feet 10 inches, the angle is too narrow, so push it out. Adjust until the diagonal reads 5 feet, then fix the strings. For a large layout, scale up to 9-12-15 feet or 12-16-20 feet, since longer legs make the same tape error a smaller fraction of the measurement.
One honest note: not every application uses traditional compass-and-straightedge techniques. A surveyor uses a theodolite, a carpenter uses a framing square, and a CAD operator uses software. The geometry is the same in every case, but the tools change with the job. The compass methods in this guide teach the geometry; the field methods apply it.
Right Triangle Construction vs. Other Triangle Constructions
Right triangles are one family among several, and comparing them shows what makes each construction different.
| Triangle type | Defining property | Typical construction requirements |
|---|---|---|
| Right triangle | Exactly one 90-degree angle | A right angle plus one of: two legs, hypotenuse and leg, leg and acute angle, hypotenuse and acute angle |
| Acute triangle | All three angles under 90 degrees | Three sides, or two sides and the included angle, with the largest side short enough to keep all angles acute |
| Obtuse triangle | One angle over 90 degrees | Three sides, or two sides and the included angle, with one side long enough to open an obtuse angle |
| Equilateral triangle | All sides equal, all angles 60 degrees | One side length, since the other two follow by arcs of the same radius |
| Isosceles triangle | Two sides equal, two base angles equal | Two equal sides and a base, or a base and a base angle |
Two cautions belong with this table. First, “right” and “isosceles” are not mutually exclusive: a triangle can be both right and isosceles, with legs equal and acute angles of 45 degrees each. The categories describe different properties, one about angles and one about sides, so they overlap. Second, the construction requirements differ in kind: an equilateral triangle needs only one length because symmetry supplies the rest, while a general acute or obtuse triangle needs three pieces of information, just like a right triangle, but without the right angle doing any of the work.
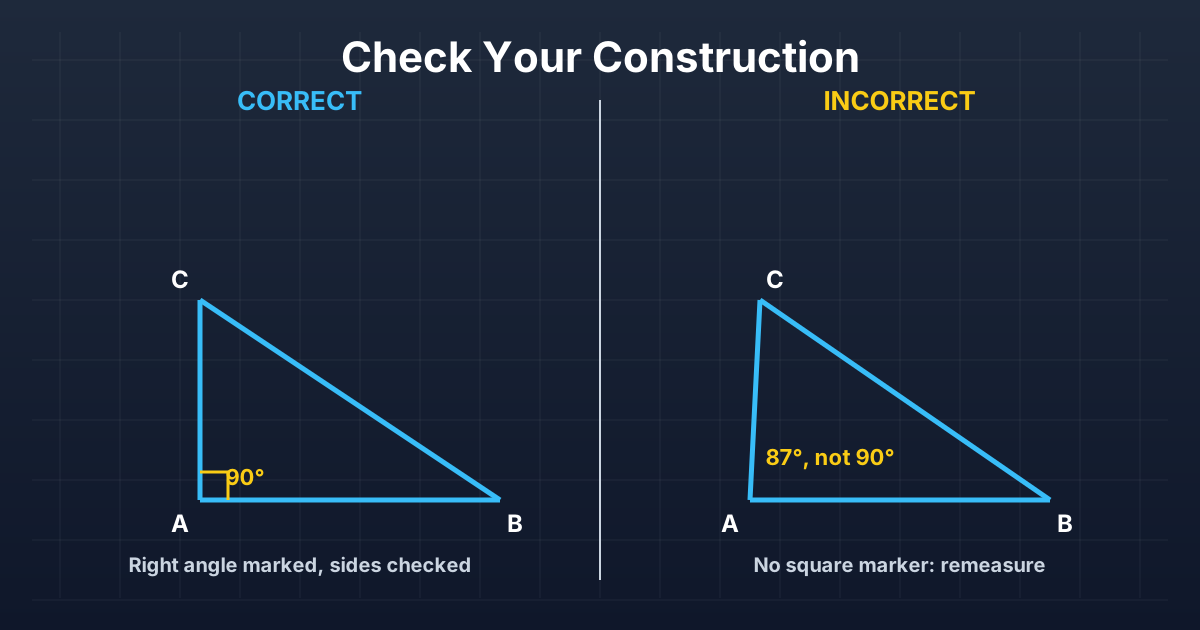
Caption: Checking a construction. On the left, the right angle is marked and the sides check out. On the right, the angle measures 87 degrees, not 90, so the triangle is not right-angled and must be remeasured.
Practice Questions on Constructing Right Triangles
Try these before looking at the answer key. The key is in the next section, kept separate so you can work honestly.
Beginner Level
Question 1. Construct a right triangle with legs 9 cm and 12 cm. What is the hypotenuse?
Question 2. Construct a right triangle with legs 20 cm and 21 cm. What is the hypotenuse?
Question 3. Triangle ABC is right-angled at A, with AB = 8 cm and AC = 15 cm. Construct it and find BC.
Question 4. Construct a perpendicular at a point on a line using only a compass and straightedge. Describe each step and explain why the result is perpendicular.
Question 5. Use a set square to construct a right triangle with legs 7 cm and 24 cm. What is the hypotenuse, and how do you check the corner?
Intermediate Level
Question 6. Construct a right triangle with hypotenuse 25 cm and one leg 7 cm. Find the other leg.
Question 7. Construct a right triangle with hypotenuse 17 cm and one leg 8 cm. Find the other leg.
Question 8. Construct a right triangle with hypotenuse 26 cm and one leg 10 cm. Find the other leg.
Question 9. Triangle ABC is right-angled at A, with hypotenuse BC = 20 cm and angle B = 30 degrees. Construct it using Thales’ Theorem and find the other two sides and the third angle.
Question 10. Construct a 3-4-5 triangle scaled by 7. What are its three side lengths, and where is the right angle?
Advanced Level
Question 11. A circle has diameter 20 cm. Point C lies on the circle with AC = 12 cm, where AB is the diameter. Construct triangle ABC and find BC and all three angles.
Question 12. Construct a right triangle with legs 8 cm and 15 cm using only a compass for length transfers and a straightedge for lines, with no protractor. Explain why the angle at A is exactly 90 degrees.
Question 13. You are given only a hypotenuse of 10 cm. Explain why this does not determine a unique right triangle, and give two different right triangles that share this hypotenuse.
Question 14. Construct a right triangle with one leg 11 cm and an acute angle of 45 degrees. What are the other leg and the hypotenuse?
Question 15. A triangle has sides 9 cm, 40 cm, and 41 cm. Is it right-angled? If so, which angle is the right angle, and how do you know?
Answer Key
Answer 1. Draw a base of 12 cm, raise a perpendicular at one endpoint, mark 9 cm on the ray, and join the vertices. Check: 9² + 12² = 81 + 144 = 225, so the hypotenuse is 15 cm.
Answer 2. Draw a base of 21 cm, raise a perpendicular at one endpoint, mark 20 cm on the ray, and join the vertices. Check: 20² + 21² = 400 + 441 = 841, so the hypotenuse is 29 cm.
Answer 3. Draw AB = 8 cm, raise a perpendicular at A, mark AC = 15 cm on the ray, and join BC. Check: BC² = 8² + 15² = 64 + 225 = 289, so BC = 17 cm. The triangle is 8-15-17, right-angled at A.
Answer 4. Mark D and E equally distant from A on the line. With equal radius greater than AD, swing arcs from D and E meeting at P. Draw line AP. It is perpendicular because P is equally distant from D and E, so it lies on the perpendicular bisector of DE, which passes through the midpoint A.
Answer 5. Draw a base of 24 cm, place the set square corner at one endpoint, draw the perpendicular ray, mark 7 cm on it, and join the vertices. Check: 7² + 24² = 49 + 576 = 625, so the hypotenuse is 25 cm. Check the corner by placing the set square back on it: both edges should lie along the legs.
Answer 6. Draw the leg of 7 cm, raise a perpendicular at one endpoint, and swing an arc of radius 25 cm from the other endpoint to meet the ray. The other leg is √(25² - 7²) = √(625 - 49) = √576 = 24 cm.
Answer 7. Draw the leg of 8 cm, raise a perpendicular at one endpoint, and swing an arc of radius 17 cm from the other endpoint to meet the ray. The other leg is √(17² - 8²) = √(289 - 64) = √225 = 15 cm.
Answer 8. Draw the leg of 10 cm, raise a perpendicular at one endpoint, and swing an arc of radius 26 cm from the other endpoint to meet the ray. The other leg is √(26² - 10²) = √(676 - 100) = √576 = 24 cm.
Answer 9. Draw BC = 20 cm as the diameter of a circle, draw a ray from B at 30 degrees to BC, and mark its second meeting with the circle as A. Angle A is 90 degrees by Thales’ Theorem. The third angle is 60 degrees. The side opposite B is AC = 20 × sin 30° = 10 cm, and the side next to B is AB = 20 × cos 30° ≈ 17.32 cm. Check: 10² + 17.32² = 100 + 300 = 400 = 20².
Answer 10. Multiply each number by 7: the sides are 21 cm, 28 cm, and 35 cm. Construct it with a base of 28 cm and arcs of 21 cm and 35 cm. Check: 21² + 28² = 441 + 784 = 1225 = 35². The right angle is opposite the longest side, 35 cm, between the sides of 21 cm and 28 cm.
Answer 11. Draw AB = 20 cm, draw the circle with AB as diameter, swing an arc of 12 cm from A to meet the circle at C, and join AC and BC. Angle C is 90 degrees by Thales’ Theorem. BC = √(20² - 12²) = √(400 - 144) = √256 = 16 cm. The angles are: sin of angle B = 12/20 = 0.6, so angle B ≈ 36.87 degrees, and angle A ≈ 53.13 degrees. Check: 36.87 + 53.13 + 90 = 180.
Answer 12. Construct the perpendicular at A with the compass method, transfer 8 cm onto the perpendicular ray and 15 cm onto the base line with the compass, and join the vertices. The angle at A is exactly 90 degrees because the perpendicular construction guarantees it, not because it was measured. Check: 8² + 15² = 64 + 225 = 289, so the hypotenuse is 17 cm.
Answer 13. One side leaves the rest free. Two valid triangles with hypotenuse 10 cm are 6-8-10 (36 + 64 = 100) and a triangle with legs 5 cm and about 8.66 cm (25 + 75 = 100). Both are right-angled and both share the same hypotenuse, so the hypotenuse alone cannot pick one. A second piece of information, a leg or an angle, is needed.
Answer 14. Draw the leg of 11 cm, raise a perpendicular at one endpoint, and draw a 45-degree ray at the other endpoint toward the perpendicular. The triangle is right-isosceles: the other leg is also 11 cm, since the base angles are both 45 degrees. The hypotenuse is √(11² + 11²) = √242 = 11√2 ≈ 15.56 cm.
Answer 15. Yes. Test the longest side: 9² + 40² = 81 + 1600 = 1681 = 41². The sides satisfy the Pythagorean relation, so by the converse of the Pythagorean theorem the triangle is right-angled, and the right angle is opposite the side of 41 cm, between the sides of 9 cm and 40 cm.
Frequently Asked Questions About Constructing a Right Triangle
Frequently Asked Questions
Common questions about constructing a right triangle, answered briefly.
01 How do you construct a right triangle?
Draw a base, build a 90-degree angle at one endpoint with a protractor, set square, or compass, mark the second side on the perpendicular ray, and join the remaining vertices. The method you pick depends on what you are given: two legs, a hypotenuse and a leg, or a side and an angle.
02 How do you draw a right triangle with a ruler?
Draw one side with the ruler, use a protractor or set square to raise a perpendicular at one endpoint, measure the second side along that perpendicular, and join the last two points. A ruler alone cannot make the right angle, so pair it with a protractor or a set square.
03 Can you construct a right triangle without a protractor?
Yes. Use a compass and straightedge to build a perpendicular at a point: mark two points equally distant from the vertex, swing equal arcs from them, and draw the line through their intersection. That line is perpendicular, so the triangle built on it is right-angled, with no angle ever measured.
04 How do you construct a 90-degree angle with a compass?
Mark two points equally distant from the vertex on a line, then swing two arcs of equal radius greater than that distance, one from each point. The arcs meet at a point P, and the line from the vertex through P is perpendicular to the original line, giving an exact 90-degree angle.
05 How do you construct a right triangle with two given sides?
If the two sides are legs, draw one, raise a perpendicular at its endpoint, mark the second leg on the ray, and join the vertices. If one side is the hypotenuse, draw the leg, raise a perpendicular at one end, and swing an arc of hypotenuse radius from the other end to meet the ray.
06 How do you construct a right triangle with a given hypotenuse?
Use Thales' Theorem: draw the hypotenuse as the diameter of a circle, then pick any point on the circle as the third vertex. The angle at that point is always 90 degrees. If a leg is also given, swing an arc of that leg length from one endpoint to fix the point on the circle.
07 What is the 3-4-5 rule?
The 3-4-5 rule says any triangle with sides in the ratio 3:4:5 is right-angled, because 3² + 4² = 9 + 16 = 25 = 5². Builders use it to square corners: measure 3 units along one edge, 4 along the other, and adjust until the diagonal reads 5 units. Scaling works too: 6-8-10 and 9-12-15 are also right triangles.
08 Can you use Thales' Theorem to construct a right triangle?
Yes. Draw the hypotenuse as a diameter, draw the circle on that diameter, and choose any point on the circle as the third vertex. Join it to both endpoints of the diameter, and the angle at that point is 90 degrees by Thales' Theorem. Every point on the circle gives a different right triangle with the same hypotenuse.
09 What tools are needed to construct a right triangle?
At minimum, a ruler, a compass, a pencil, and paper. A protractor or set square adds the measured methods, while a compass and unmarked straightedge give exact constructions without measuring angles. A sharp pencil matters more than people expect: thick lines hide errors of a millimeter or more.
10 How do you check whether a triangle is right-angled?
Measure the angle with a protractor or set square and look for 90 degrees, or measure all three sides and test a² + b² = c² with c as the longest side. If the sides satisfy the relation, the angle opposite the longest side is a right angle by the converse of the Pythagorean theorem.
11 Can a right triangle also be isosceles?
Yes. A right triangle is isosceles when its two legs are equal, which makes both acute angles 45 degrees each. The categories overlap because one describes angles and the other describes sides. A triangle with legs of 5 cm each and a hypotenuse of about 7.07 cm is both right and isosceles.
12 Is one side enough to construct a unique right triangle?
No. One side leaves the other measurements free: a leg of 6 cm belongs to many triangles, such as 6-8-10 and 5-6-√61, and a hypotenuse of 10 cm belongs to many more. To fix a unique triangle you need a second piece of information: another side or an acute angle.
13 What is the easiest method for beginners?
The ruler and protractor method: draw the base, mark 90 degrees with the protractor, measure the second side along the ray, and join the vertices. Every step is a direct measurement, so mistakes are easy to spot, and the Pythagorean check at the end confirms the result.
14 Why is a compass useful in triangle construction?
A compass transfers lengths exactly and builds perpendiculars and angle bisectors without measuring anything. That makes constructions exact rather than approximate: a length copied by compass is the same length, while a length read off a ruler always carries a small estimation error.
15 What are common errors in geometric constructions?
The usual errors are a protractor set off center, a compass width that slips mid-arc, measuring from the ruler end instead of zero, joining the wrong arc intersection, and skipping the final check. Labeling every point as it is created and verifying with the Pythagorean theorem catch nearly all of them.
Key Takeaways
- A right triangle has exactly one 90-degree angle, two perpendicular legs, and a hypotenuse that is always the longest side.
- Fix the right angle first, then place the remaining measurements: every method in this guide follows that order.
- Two legs, a hypotenuse and a leg, a leg and an acute angle, or a hypotenuse and an acute angle each determine a unique triangle; one side alone does not.
- Thales’ Theorem turns any diameter into a right angle: pick any point on the circle and the angle there is 90 degrees.
- The 3-4-5 rule and its scalings give a right angle from side lengths alone, on paper and on a building site.
- Always verify a finished construction, with a protractor, a set square, or the Pythagorean relation.
Conclusion
Constructing a right triangle comes down to one square corner and the measurements that complete it. The right angle can be built with a protractor, a set square, or a compass, and each tool suits a different situation: the protractor is friendliest for beginners, the set square is fastest, and the compass gives exact results without measuring an angle. From there, the given information picks the method: two legs, a hypotenuse and a leg, a side and an angle, or the 3-4-5 rule. Thales’ Theorem adds a powerful shortcut, turning any diameter into a right angle. Whatever method you use, finish with a check, either the protractor or the Pythagorean theorem, because a construction without a check is only a sketch. Now try the practice exercises, first with a protractor and then with a compass alone, and watch how the same geometry works through different tools.